Friday, June 29, 2012

Sneak Peek

I'm working on an original crochet design.  This is a little sneak preview.  I'm almost done with the "prototype" and hope to have a basic pattern worked out soon.


The other night I was thinking of different things I could make/design for my shop and an idea flashed in my head.  As soon as I got home I started working on it because I feared if I just put my idea on paper that I wouldn't remember clearly what I was thinking.

So far it's coming out pretty close to what it looked like in my head.

Saturday, June 16, 2012

Sneak Preview


A little sneak preview of what I'm putting together for my Etsy shop which should re-open soon.

Tuesday, December 7, 2010

Of Babies and Blankets

Way back in August my cousin had her second child, a girl, born with the best birthdate ever (8/9/10)!

Soon after I started a blanket with the intention of giving it to her for the colder months.  Well here it is December already and I'm not quite done.

Because this blanket is HUGE!  The pattern I used, a Catherine Wheel crochet stitch pattern is based on a 10 stitch repeat.  At this point I don't remember how many stitches were in the starting chain - 80?  100?  150? More?

All I know is that this can not be referred to as a baby blanket.  This is more like a toddler blanket, a small afghan really.  I've worked on it nearly exclusively while sitting at the cold ice rink while my daughter has her lessons.  If I had to estimate I would say it's about 80% done.  Yet I probably need about 10 more hours on this thing until I'm satisfied with the proportions.  It is large enough to keep my entire lower half warm while I work on it.

I'm switching colors every two rows and each row takes anywhere from 30 minutes to an hour, depending on attention level.  Because of the multiple colors it has strong horizontal lines and the blanket is worked from the bottom up, so to speak.  Right now it is wider than it is tall.  I need to keep going until it is at least square for my symmetry-loving brain to deem it acceptable for gifting.

Fiber snobs, sheild your eyes, for I have made this out of soft baby-melting acrylic.  Chances are quite high that this blanket will be peed on, pooped on, spit up on, spilled on, dragged on the ground, etc.  It needs to be durable and washable, and it needed to cost less than a car payment to make.


Romy's Blanket

I've kept it under wraps for quite some time, but I'm giving you all a sneak peek.  As soon as it is 100% complete (and gifted) I will post a photograph of it in all it's glory.  The colors remind me of an ice cream parlor and I love how the pattern has a bit of a 70's retro feel to it.

Hopefully my cousin will like it.

Skating is Life

As I sit in the cold metal stands watching my daughter's skating lesson I realize that she is learning much more than skating out on the ice.  She's developing tools that will help her succeed as she grows as a person as well.


Becca's Skates

Balance is one of the first things she learns.  Finding her center, figuring out how much she can lean forward and backward without falling over.  Standing her ground amid the flurry of skaters she learns how to stand on her own and not let others intimidate her, yet she is still courteous - letting the skater performing a run-through of her program ample room to execute her pattern and elements.

After balance comes control.  Skate too slow and she doesn't have the momentum to execute a jump or direction change well.  Too fast and she is suddenly past the limits of her ability and becomes a danger to herself and others.  Control is knowing when to slow down and when to speed up and finding that sweet spot where everything works as it should.

As she masters balance and control she gains confidence.  With this confidence comes the desire to try new things, even if they seem scary or downright impossible.  Confidence is not expecting to do everything perfectly the first time, but it is having the knowledge that with proper instruction and practice her abilities will develop and she will make the most of the talent she possesses.  Having this confidence also means that she will take criticism well and use it to improve her performance.

With repetition and additional exercise she develops flexibility.  She can extend herself to get the most out of her performance and she can stretch until she can attain what was once out of her reach.  She can also adapt to different rinks and ice conditions without it throwing her entirely off her game.

The last and most important thing she learns is perseverance.  Learning how to skate means falling.  Often. Every time she falls, she must get back up again.  Giving up isn't an option.  Her program needs to be seen through to the end.  She will fall 10, 20, 30 times before finally landing a new jump, but she will learn it.  She will learn how to shake off the bumps and bruises she acquires along the way, knowing that if she sticks it out she will have expanded her body of knowledge and will be proud of the fact that she stuck it out and learned something new instead of giving up and always wondering, "What if?".

Sometimes she doesn't want to go to the rink.  Sometimes she would like more free time, but what she is learning on the ice is invaluable and they are skills that will help her be successful not just in skating, but in life.


Wednesday, September 15, 2010

Jardiniere

One of my dad's favorite treats is jardiniere.  I remember when he and his friend would open a jar and eat it usually with Mexican food and beer.  Both would become red in the face and sweat would pop out on their foreheads.  I always thought it looked like a painful food to eat, but they both assured me that it was quite good.

For years afterward I had wanted to make jardiniere for my dad but never managed to get around to it.  This year I had so many fresh veggies from my garden that I decided it was time.  This one is for you, Dad!

Good jardiniere starts with fresh ingredients. Well, good anything starts with fresh ingredients, but you know what I mean.  I was lucky enough to get most of the ingredients from my garden, including the herbs.  I omitted the mushrooms, substituting hot peppers (jalapeno and Hungarian hot wax), and added celery I bought from the store.  If I had been thinking I would have picked up some cauliflower as well.  Oops.  At this time I should probably let you know that I started with the recipe in the Ball Blue Book.


Fresh Veggies 
Fresh harvest from the garden, except for the celery

I spent the next hour or so chopping the vegetables into fairly uniform sizes.  The sweet peppers were cut into strips and the onions were sliced. Because I think it looks neat, I cut the hot peppers into rounds.  All of the cut vegetables and herbs were put in a large bowl.  While I was chopping, the cider vinegar and pickling spices were coming to a boil on the stove.  Unless you are seriously congested, do not put your face over the boiling cider vinegar/spice mixture and inhale, it may cause pain.

Ask me how I know this.

After all the vegetables were sliced and the cider vinegar mixture comes to a boil, add the veggies to the pot, stir and heat just until they become tender.  These will be getting a boiling water bath in a bit, so be sure not to overcook them.  Nobody like mushy jardiniere.


Veggies Pot

Veggies cooking in the pot.

While the veggies were cooking, I put my sterilized jars on the rack suspended above the water in my canning pot to heat them up.  Putting hot ingredients into cold jars can cause breakage, so better to be safe than sorry.

I packed each jar with the veggies and ladled the hot liquid over, leaving about 1/4" of headspace.  Check for air pockets and bubbles, I like to use a clean chopstick to release the bubbles.   Add a little more liquid if necessary, seal and process in boiling water according the the recipe directions.  Times vary according to altitude.  Remove the jars to a towel or tray to cool and admire the pretty colors!


Jardieniere

Oooh, pretty!

Tuesday, September 14, 2010

Apple Picking at Shafer Orchards

Every year in September we travel up to Michigan with friends to pick apples at Shafer Orchards.  We've done this as a tradition for quite a few years, sometimes squeezing in a few wine tastings at the local wineries.  This year the weather was chilly and rainy, the perfect weather for apple picking!


Barn

The barn at Shafer Orchards

As usual, the Shafer family is friendly and welcoming, showing us where the best apples are.


Shafer

Mr. Shafer leading the way

Since I am interested in using the apples mainly for baking, I stick to the variety that works best and is in season, Golden Delicious.


GoldenDelicious

For a reason I can't quite figure out, my husband is a big fan of Red Delicious apples so a few of those go in the bag as well.  Since the Jonathan and Jonagold apples are also in season, we snag a few of those for snacking.  After filling the bag halfway I swear that I am going to source actual wooden bushels for use next year, I think the bags encourage bruising and they tend to roll around in the trunk more often.

Upon arrival, Mr. Shafer made the "mistake" of showing one member of our party where to find a variety called Molly's Delicious.  I'm in the mood for a snack so I pick one off the tree, take a bite, and...

...Oh. My. Goodness!  It's like candy that grows on trees.  Molly's Delicious is the best tasting apple I have ever had.  It's crisp and sweet and the skin is delicate.  If you can find a source for them in your area, I encourage you to try them at least once.


RedDelicious3

Red Delicious apple trees

After picking a bushel and a half of apples (three bags) we are done and head out.  Before leaving I also pick up two acorn squash and some honey from a little "farm" down the road.

Our group heads down to the home of FloraLia honey and it is my idea of paradise.

There are goats:


Goats

One of these guys tried to eat my pigtails when I pet him

and llamas:


Llama

The brown one does not look happy!
and chickens:


ChickensChickens2

and turkeys:


Turkeys

and everything is slightly messy in the most charming of ways.  It's like discovering a little fairy garden in the middle of the vineyard.

After our traditional dinner of pizza, we head home and I'm rendered speechless by the technicolor sunset.  What a beautiful end to a day that started out cold and rainy!  I snapped some pictures from the passenger seat and I just had to share:


Sunset1


Sunset2


Sunset5
I also picked up something else I'll be working with this week:
Sneak Peek

So, what did you do this weekend?

Pumpkins: Puree and Pepitos

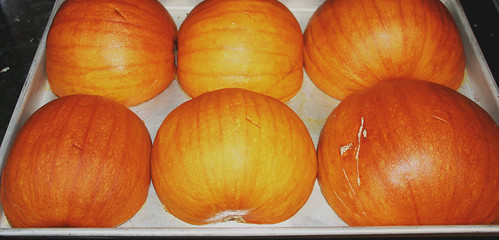
Not sure if I mentioned it before but I managed to harvest 13 'Small Sugar' pumpkins from one single plant in my garden.  In August.


Pumpkins


August Pumpkin Harvest


Maybe it's just that I'm so used to pumpkins being associated with Halloween and Thanksgiving that it seems ridiculous to have harvested in August.  Yet if you live anywhere near the Chicago area, you know that this year's gardening season has been ridiculous in it's own way.  We had a quick start on the warmth (never to really drop down again) and copious amounts of rain early on.  A fantastic start to an amazing summer harvest.

Back to the pumpkins.

When I planted the pumpkin this spring it was always in the hope that I would have enough for my aunt to make at least one of her incredible pumpkin pies (she is the one who always makes them for Thanksgiving.   Always.).  Imagine my surprise when somewhere around the end of June I was checking out the pumpkin progress and I started counting.  My expectation was to get 3-4, perhaps 5 pumpkins if I were lucky.  I was downright giddy with the thought of 13 pumpkins.   The last week or so of August the pumpkins turned orange and the vines shriveled up.  It was time to harvest.   One sad little pumpkin felt light and sort of spongy and hollow, so I pitched it.  The others sat on my dining room table for about two weeks while I worked up the courage and studied my schedule to find the time to process them.

In my mind, I had made the actual process of turning my pumpkins into puree difficult and complicated.  After a short stint of online research I realized that I had worried for nothing.  Except for maybe the time investment, but more on that later.

I have one oven.  As much as I have lusted for a double oven and walk in pantry, sadly I have neither.  So I would have to do this in batches.  In other words, there goes my day.  I started with the smaller pumpkins so I could fit more in to start.  After pre-heating the oven to 300 degrees,  I cut each one vertically from stem to bottom, scooped out the seeds and pulp (I put these aside) and lay them flesh-side down on a cookie sheet prepared with a light coating of non-stick cooking spray.


Pumpkin Cut


Pumpkin Scooped


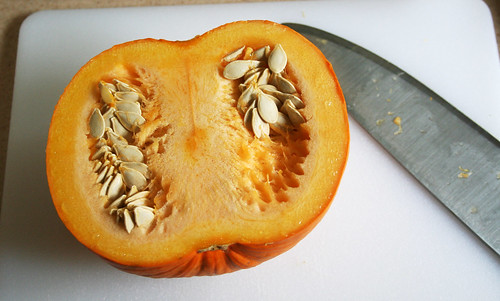
I let them bake for about 45-60 minutes in the oven.  When they can be pierced easily with a knife they are done.  While they were baking I set up what I needed to process the pumpkin into puree:  a cutting board, sharp knife, food processor, large bowl, and freezer bags.  I also cut and prepared two more pans of pumpkin to go in the oven when the current batch came out.  I would have three batches in total.


Pumpkin Roasted

Roasted Pumpkin


When the pumpkin was done, I took it out and let it cool ever so slightly (no more than a couple minutes).  Then I got to work separating the flesh from the skin.  Unfortunately it wasn't as intuitive as I thought it would be, but after a few pieces I got a rhythm down and was able to consistently and quickly get the pumpkin flesh off the skin and into the food processor.


Pumpkin Processor


Pumpkin Puree


I pureed the pumpkin until all lumps were gone, transferring it to a large bowl so I could work on the remaining pieces before they cooled off (it's easier to remove the flesh from the skin while the pumpkin is still relatively hot, it gets more difficult as it cools).  Once all the pumpkin from the first batch was pureed and in the bowl I started filling freezer bags.  This is where the online directions diverged in their methodology.  Some said to strain the puree in cheesecloth to get rid of excess moisture, others (like The Pioneer Woman) said it is not necessary.  Bowing to the gods of sloth I decided against straining.

The first bag I filled, I measured the puree first so I could get an idea of how much I was putting in each bag.  Once I realized that 3 heaping scoops of my scraper/scooper was about 2 cups, I was in business.  I transferred approximately 4 cups of puree into each gallon size freezer bag.

You might want to take note of the fact that all these sites consistently said that each pie pumpkin would yield around 1 to 1 1/2 cups of puree.  After processing the rest of the 12 pumpkins I wound up with 4 gallon size bags and 2 quart size bags of puree.  That is a total of ~18 cups, which averages...*drum roll*... 1 1/2 cups of puree per pumpkin.


Puree Freezer

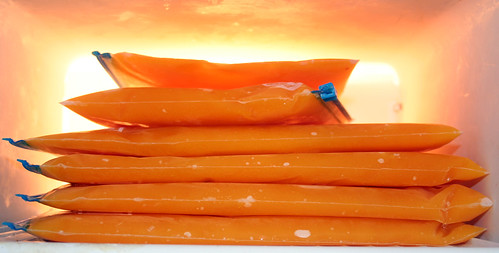
18+ cups of pumpkin puree!


Now here is where the kitchen math gets really interesting.  If the average pumpkin pie uses approximately 2 cups of pureed pumpkin, then I have enough for 9 pies!!!  The puree is stacked nicely in my freezer awaiting delivery to my aunt who is going to make at least one test pie to see how it works for her.  I may keep a few cups of puree for pumpkin bread, or muffins, or pancakes.

Remember the seeds I told you I put aside?  While the last batch of pumpkin was in the oven, I rinsed and cleaned the seeds and soaked them in saltwater for about 45 minutes.


Seeds Soak

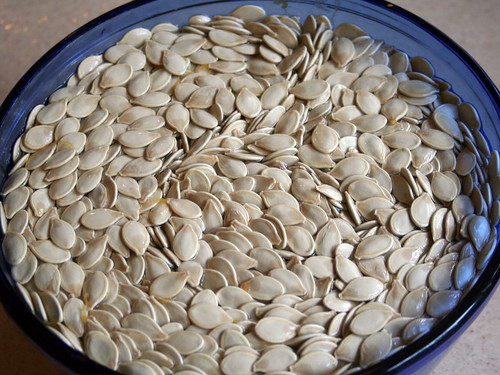
Seeds getting a saltwater soak.


I rinsed them again and spread them out on two cookie sheets.  This made for a fairly thick layer of seeds per sheet, but it is nothing to be concerned about.


Seeds Sheet


I drizzled a few tablespoons of olive oil over each of the pans and stirred them with my hands (I found that trying to stir with anything else caused them to jump out and over the sides of the pan).  The first pan got a sprinkling of sea salt and were stirred again.  The second pan got a sprinkling of Old Bay seasoning.  They went into the still hot and running oven.  After 10 minutes I checked on them and found they were starting to stick to the pan a little, so I gave each pan a bit of a shake to knock them loose and evenly distribute the seeds.  I kept checking on them every few minutes until they started to look drier, shaking every time I opened the oven.  After about 30 minutes some of the seeds were starting to brown, so they got a final shake and 5 more minutes in the oven.  I took them out and let them cool, sampling one or two to make sure they were truly done.  After they cooled I put them in clean mason jars to store, and had a little over 3 pints of roasted seeds in total.  It took my family about 2 minutes until they pounced on this treat and even my picky eater loved them.

Originally I wasn't going to roast the seeds, but after cleaning the first pumpkin I realized that there was a treasure trove of seeds and I wasn't about to let them go to waste.  I'm starting to think that pumpkins are designed to take over the world because there is no reason for the sheer multitude of seeds to be found in each pumpkin.

After killing the afternoon (and the better part of the evening) I was exhausted, but knew that I would have more of my harvest to preserve tomorrow.

Tomorrow:  Jardiniere